Character design tutorial for Mafia Death Game
Real time order where I will share all steps in the character design tutorial for Mafia Death, from the first sketches to the final result. Notice this is more a case studio than a tutorial (for specific technique procedure I suggest my Photoshop Courses). My goal here is to show the design process.
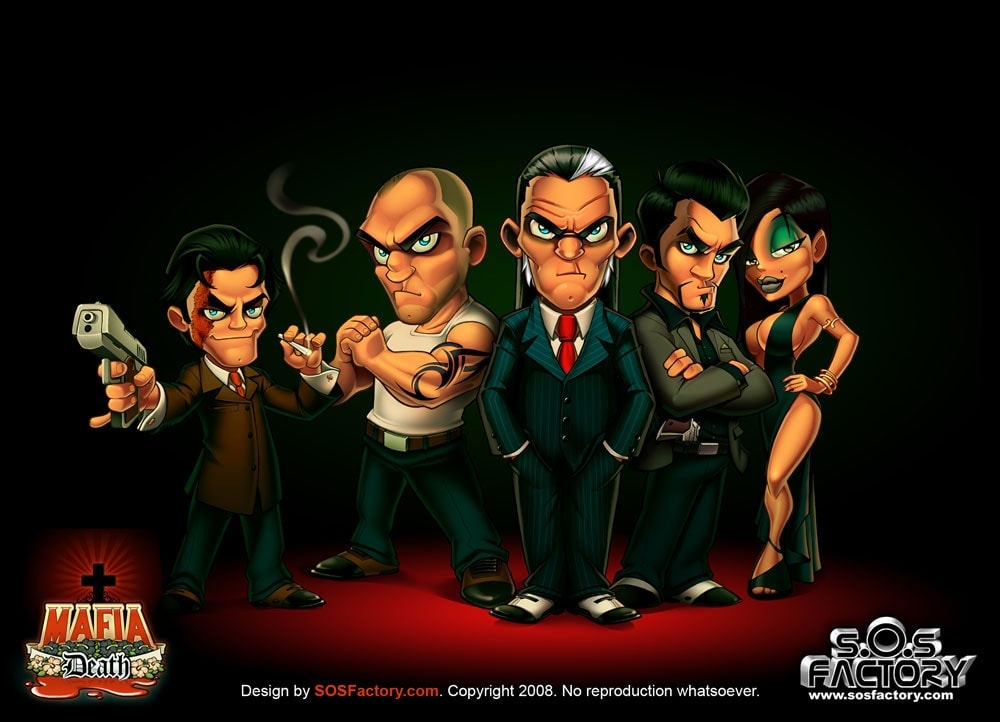 Final mascot designs for Mafia Death.
Mafia Death Game
- Client: Mafia Death, online PBBG game about mafia stories.
- Order: Design of five mascot designs and cartoon logo. The mascots should be work standing alone and as a group shot.
Character’s descriptions:
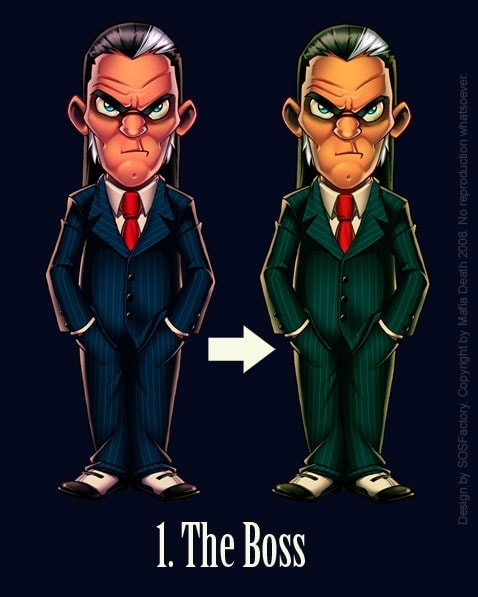
- The Boss: The family’s chief, with a raise of an eyebrow you are a dead man. Not very talkative, not specially strong physically… His better weapon is his brain.
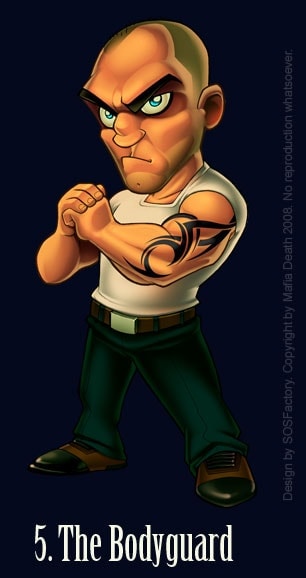
- The Bodyguard: He is the brawny of the team, the one who fixes the loose ends. His favourite sound? The crack of a breaking neck. If you notice him parking in front of your house, you have less than 10 minutes to make your last will.
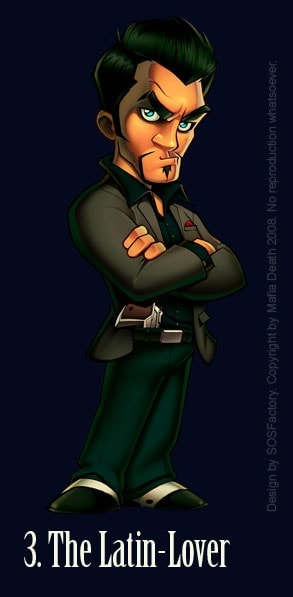
- The Latin-Lover: He is in charge to negotiate the important deals. A smart guy, attractive, athletic, with a fine taste for clothing and women, latin appearance and charm. He has a weakness for blondes and is quite independent. If you go out at night with him, tell your parents you won’t arrive home before noon.
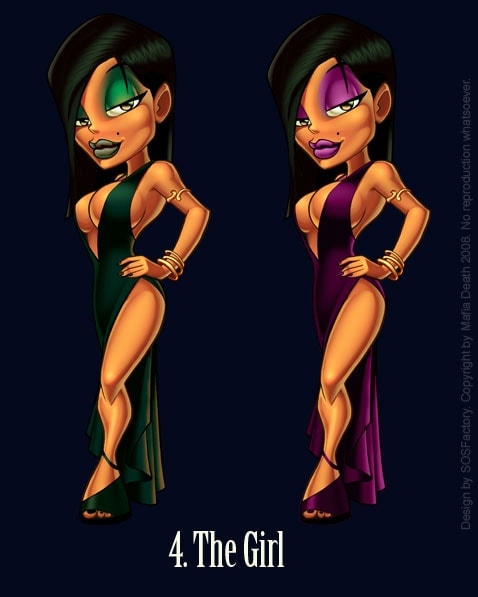
- The Girl: Only her sensuality matches her wickedness, she is cold and calculating. She is a precision weapon. She succeeds both between men and women. The last one who mentioned her affinity with Angelina Jolie is dead.
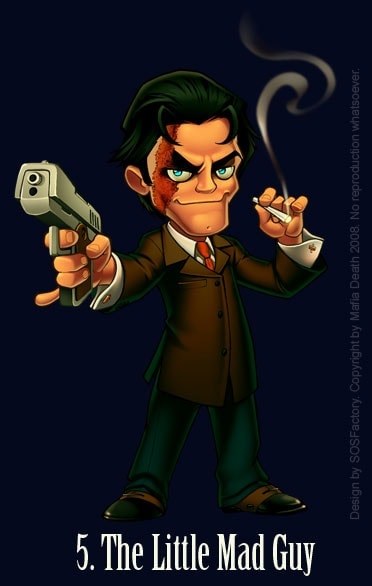
- The little mad guy: His slogan is: “Surviving is irrelevant, what really matters is how many ones you can take to the graveyard”. His mind is so insane that he is only useful in desperate missions. Joe Pesci fan. One more important thing: Don’t ask about his scar.
1.- Sketching the First Three Characters
I love Mafia films, so I didn’t need to look for any references and we directly went for the sketches. I aimed for a mid point between the elegance of “The Godfather” and the modernity and daily look of “The Sopranos”.
I asked my friend Miguel Ruiz to help me with the sketches, I sent him descriptions for each character and the image below is what he sent me back.
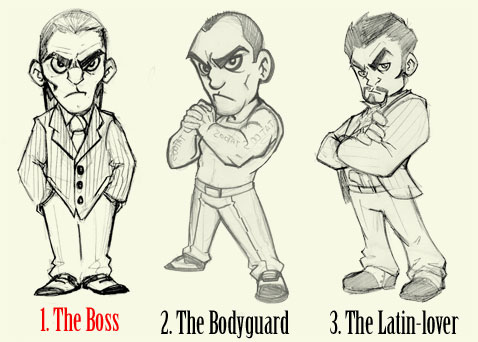
The first thing that hits you in the eye is the style, it is not the usual SOSFactory style. But don’t worry, because in the end everything will match. What really matters now is the character’s attitude, their pose, facial expression, the clothing… that each character communicate what the right attitude:
- The Boss: I think this one is great, it is exactly what we need. He has a relaxed pose but transmits a lot of strength by his look. His legs look a bit short for my taste and his waist is a bit wide, but it is an excellent starting point.
- The Bodyguard: I think this character is quite good too. I’d like to put all the characters on a horizontal line so I’ll have to modify a bit his right leg, which is a bit short. The hands pose doesn’t satisfy me, and I have to work a bit on the left arm musculature too. The face looks perfect to me.
- The Latin-Lover: This character needs quite a lot of work. I like the pose but it’s too lateral, there is very little space left for the chest, so it won’t look good. We don’t have place for the gun either, so we’ll put him in a ¾ pose, a little more frontal. I don’t like the feet pose at all, we’ll put them in a 90 degrees angle. The face has to be retouched too, I need him to be more attractive.
Summary of the day: I like the sketches, they have to be improved technically, but they transmit the proper attitudes, specially the first two ones. The third one has to be almost completely redone. See you tomorrow!!!!!!!
2.- Sketches of the Rest of the Team
I got the sketches for the 2 missing characters:
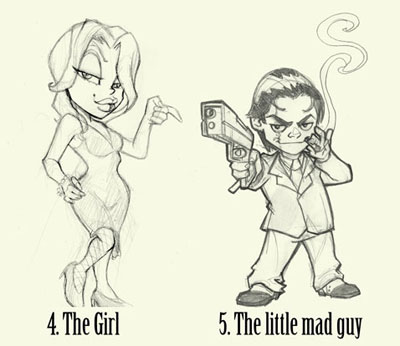
- The Girl: I like the facial expression of this character, but she looks too Chicago 20’s. We need her more modern and sexier, I think we’ll have to make many changes.
- “The little Mad Guy”: I like his attitude, but technically it’s quite wrong. The hand of the gun is too short; the hand that holds the cigar is too close to the body, we’ll separate it to make the pose clearer; the waist is too wide, it has to be slimmed a bit. He looks too young, I need an older character.
Summary of the day: We already have 5 character’s sketched, the first 2 ones are good, for the rest I’ll make many changes. Tomorrow I’ll make the scene composition. Regards!!
3.- Scene Composition
So here we go: 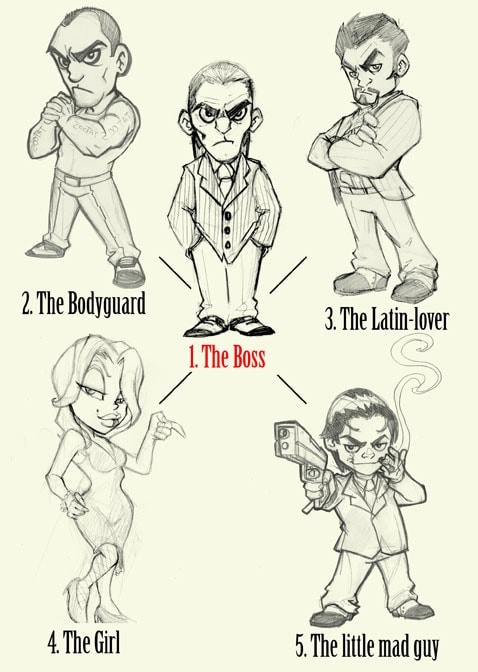
We already have all the team members, now we have to line them up looking for a good composition. I think the central mascot character should be the Boss, the Bodyguard on his right (his right hand man), on his left the negotiator (completing the trio of important characters), by his side will be the girl (we add a bit of sexual tension) and the shortish guy on the opposite side to balance the composition.
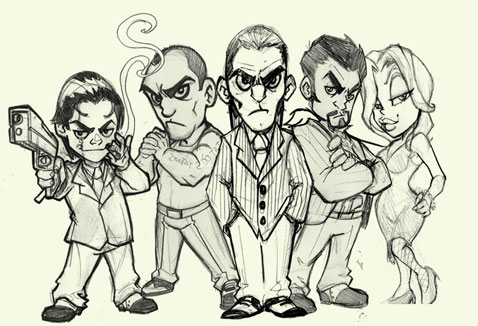
Summary of the day: We already have the scene composition, together they look very promising, much better than I expected. From now on I will retouch each character. Let’s have fun!
Looking for Character Design courses?
-
 This product has multiple variants. The options may be chosen on the product page
Learning digital painting in Photoshop
Price range: 6$ through 10$ -
 This product has multiple variants. The options may be chosen on the product page
Learning digital drawing with Photoshop
10$
4.- Cleaning the Sketches
In this step, I try to fix the stuff I commented on from Day 2, I use my Wacom Cintiq and Photoshop, from now on I work digitally. I use old sketches, references from other designs or photos, I draw once and again until everything is well defined.
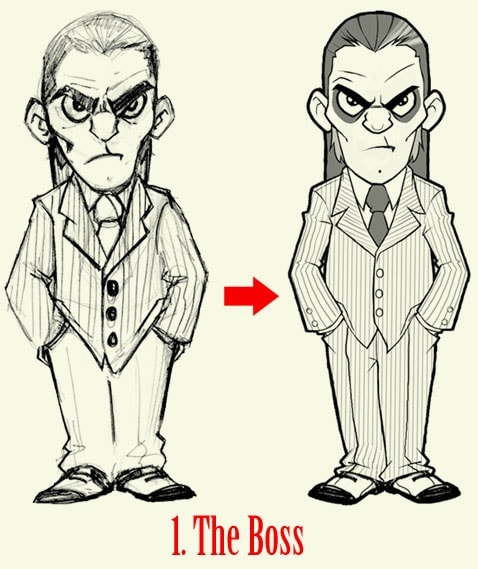
The Boss: I made his legs longer, I reduced the waist a bit, I added some details to his suit, I defined the volumes a bit and I retouched the face.
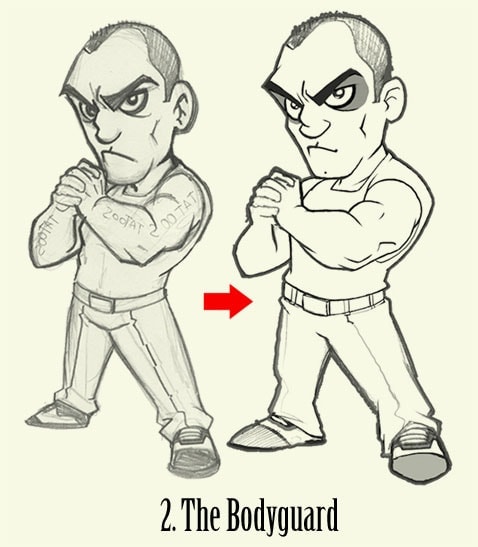
The Bodyguard: I mainly worked on the torso. Notice that I lowered his arms to make his face clearer. I retouched his left arm and I corrected a bit the tallness of his legs.
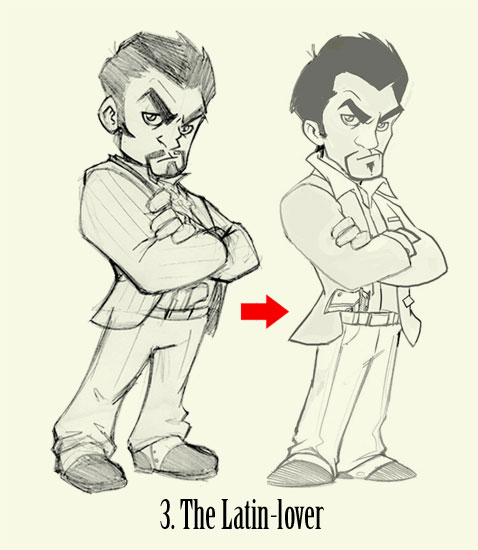
The Latin-Lover: this character is almost completely redone. I made a little more frontal pose and I lowered his arms to gain some space in the chest area. I drew his legs in a smarter pose, and I gave him a more attractive face.
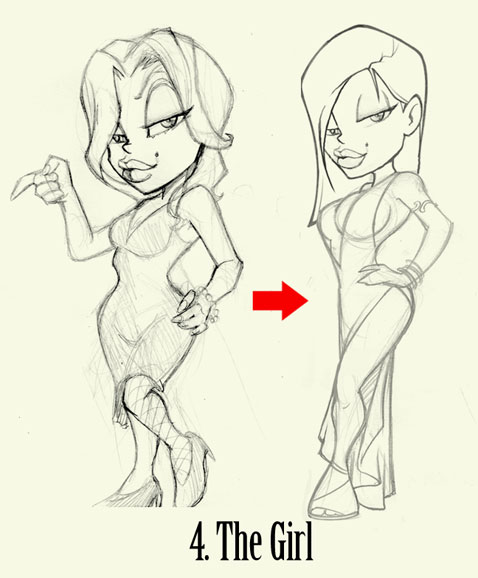
The Girl: I only kept the facial expression of the original character. Luckily I had a sketch I hadn’t used before, and it fit quite well. Now she’s much more sensual and has a more modern look. I used Angelina Jolie as a reference.
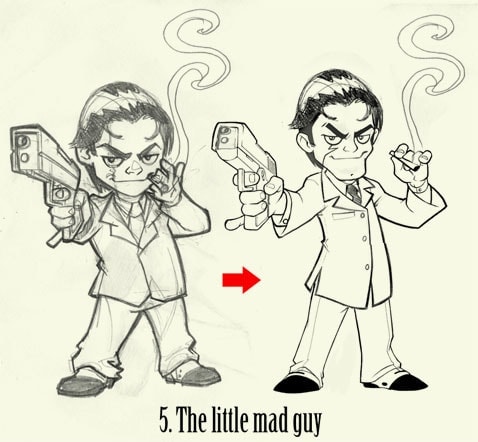
The Little Mad Guy: I also changed this character almost completely. The arm that holds the gun was too short so I separated it a bit from the body. I separated the gun with the cigar too, this way the silhouette is much clearer. I stylized the pose with a narrower waist and separating his legs (a much more active pose), I added a clearer scar and a more pronounced chin.
Summary of the day: The first two characters were easy to correct, from the third I re-drew them… Everything is going as I expected. Let’s continue tomorrow 🙂
5.- Inking the Characters
We already have all the characters ready, now it’s for digital inking in Photoshop.
I already explained my digital inking in my Masterclass, so I wont repeat it again. As you can see there is no secret tips, just practice.

Summary of the day: After a week of vacation in Berlin, I’m back to work. The drawings are ready for the coloring, this is gonna be really fun. Regards!!!
6.- Coloring The Boss
Digital coloring in Photoshop is my speciality, it’s what I like best and the part I spend more time at. I usually color with a cartoon style, with very bright colors, but in this case I think that more moderated colors will fit better, fun but mysterious, with very contrasted dark tones.
I made a first version with cold colors, it looks OK, but I think that with warmer colors, and more “worn out” tones, it matches better with the theme. Don’t think I colored it all again from the beginning, I used the Photoshop correction tool (Command + B) and I added a bit of Cyan and Green. Easy, isn’t it?
Again all steps are covered in my Masterclass about digital coloring with Photoshop.
Summary of the day: after many hours of testing, the color looks great, the challenge is now to compound the scene to make the 5 characters work as a whole.Tomorrow, more!!
7.- Coloring the Latin-Lover and the Girl
Now that I have defined the color palette I can work faster. The characters still look good to me separately, but too laden when I put them together. That’s because I decided to soften a bit the colors, here goes the second character – ready!
And here we have the girl. She looks great but we have a problem. The most eye-catching color range is the one on the right, but the more coherent with the rest of the characters is the one on the left. My choice would be to sacrifice the character for the sake of the illustration, but the client doesn’t agree… We’ll see what happens.
Summary of the day: We have already finished the most difficult part, to choose the color ranges, so I’m going quite fast and I’m feeling comfortable. I expect that as I continue working the color will be improved. Let’s continue tomorrow!!!

Don’t miss my next Blog Post!!
Shy? ok, alternatively you can follow me at
8.- Coloring the Little Mad Guy and the Bodyguard
Alright mates, I finally finished all the mascot characters 🙂
I’m specially proud of the last two ones, they are exactly as I imagined them at first. Unfortunately, I only achieved this from the third character (although the first ones are not bad at all). Notice that these characters look good separately, but because of the softer color and a less contrasted source of light, they are more harmonic and will look better when we compose the scene.
The worst part of this character was the musculature… Ufff!!! But it’s finally looking good. I also corrected the position of the hands.
Summary of the day: The last two characters were beautiful, quick and fun to make, I finally got it. After five characters with this color style, I think I can handle it, this will be very useful for me in the future.
Day 9: Final Illustration
At last, the great day, after many hours of work I can say the illustration is finished. I made some color corrections to unify each character.
Summary of the day: As I expected, I had to make some adjustments to join the characters. I’m quite happy with the result and the client too. So another good piece for the SOSFactory Mascot Design portfolio.
Thanks to David from Mafia Death for giving me permission to share this info, please give him some love and sign up to play his game.
Kalsten
Posted at 06:51h, 28 MarchMe encanta la idea. Tengo ganas de empezar a ver tus progresos 😀
Sergio Ordonez
Posted at 20:55h, 28 MarchDe nada Kalsten, ahí vamos 🙂
Diepar
Posted at 00:15h, 29 MarchSergio, que buen blog que tienes, felicidades, soy diseñador grafico, mi línea es lo editorial. Muy interesante este nuevo proyecto, seguiré pendiente, ojalá puedas tener el tiempo para mantenernos al tanto. Un abrazo
Sergio Ordonez
Posted at 11:31h, 29 MarchHola Whitefeet, pues sí que es buena idea, pero sólo funcionaría si la gente se implica… y eso ya es más complicado. Quizás cuando el blog crezca sea posible.
Whitefeet
Posted at 10:09h, 29 MarchMuy buena idea, aunque soy programador y me dedico al mundo de la web principalmente, llevo tiempo siguiendo tu blog, me gusta el diseño y ojalá tenga tiempo de aprender. De momento tus consejos son estupendos.
¿¿Y si alguna vez crearas algún proyecto con la colaboración de todos?? me explico, lógicamente no podría ser un proyecto real, tu tienes tu metodología, pero crear un caso práctico aunque fuera ficticio para que pudiéramos entre todos aportar ideas y ver un resultado… No sé, es una idea, al ver los bocetos se me han ocurrido algunas para el latin lover, jeje, y lo he pensado.
Jonathan
Posted at 15:46h, 29 MarchMe encanto la idea, visitare seguido para ver el progreso del proyecto!
Fantomas
Posted at 18:21h, 29 MarchQue buena idea Sergio. Como diríamos aca en México: eres un chingon! je je. Felicidades por este espacio altruista de conocimientos y estoy a la espectativa de el siguiente paso del trabajo. Saludos!
Jonathan Betancur
Posted at 02:04h, 30 MarchWow viejo me sorprendio un monton que visitaras mi humildisimo blog, sos un tipo que respeto y sigo en mis feeds, sos un capo como dirian por aca, muchas gracias por tu visita.
Isiris
Posted at 08:06h, 30 Marchcomo siempre, estupendo!
sin palabras.
un saludo
maki
Posted at 16:28h, 31 MarchGenial, hace poco tiempo que sigo su blog y la verdad es que es muy bueno, este proyecto está muy interesante.
Como decimos en Costa Rica, Pura vida!!
Fantomas
Posted at 01:23h, 01 AprilHola Sergio. Tu trazo en Photosop es fabuloso, todo fue hecho en este programa cierto? es decir, nada de ilustrator? La verdad sólo quisiera hacer un respetuoso comentario si me lo permites. En el personaje “The little Mad Guy” la cicatriz de su rostro se ve a mi parecer como si el tipo trajera un monóculo. Tal vez habría que hacer mas evidente la representación de la cicatriz. Espero no haberme entrometido de más. Tu blog está más emocionante que la serie Lost jeje. Es todo un Reality. Saludos!
Sergio Ordonez
Posted at 07:39h, 01 AprilHola Fantomas, sobre lo de la cicatriz no te preocupes, verás que cuando le de color quedará bien. Estaba pensando en ponerle una quemadura en todo ese lado de la cara.
Whitefeet: es todo Photoshop, por ahora todo con pinceles, nada de trazos, se ve bien porque esta reducido, en realidad está todo muy sucio.
Saludos!
Kalsten
Posted at 08:44h, 01 AprilEstoy disfrutando como un enano 😀
Levi
Posted at 04:10h, 01 Aprilen definitiva, desde que sigo esta pagina, me latio cañon este rollo altruista!!!nunca habia visto una pagina que diera tantos consejos, practicos y sobre todo reales…creo que nunca dejare de seguir la pagina, y pues seguire practicando con tus consejos para poder llegar lejos…como tu!
gracias, por los consejos y por demostrarnos como se hace…
Whitefeet
Posted at 06:48h, 01 AprilIba a preguntar lo mismo que Fantomas, sólo has utilizado Photoshop?? ¿pinceles sólo, o también trabajas con la pluma? si tienes tiempo y puedes explicar un poquito…
Me tienes enganchado a esto, jeje.
Rafa
Posted at 03:15h, 02 AprilDesde que encontre tu blog por los consejos de autonomo te sigo, me pareciste muy bueno y bastante directo con consejos practicos y aportando tu experiencia en todos los campos que eso es mucho.
Asi que felicitarte por tu trabajo, sigue asi!!
Sergio Ordonez
Posted at 20:42h, 02 AprilHola Nico, saber cuanto he cobrado es tan facil como mandarme un email pidiendo presupuesto o ir a mi pagina web, donde tengo los precios.
No tengo ningun contrato firmado (de todas maneras pedi permiso al cliente), asi que ningun problema.
Saludos
Nico
Posted at 20:34h, 02 AprilMe parece excelente la idea de ir describiendo el proceso del trabajo, aunque no estoy seguro si publicar el presupuesto sea tan bueno. ¿El cliente sabe que publicas el precio? ¿Está realmente bien decir cuánto le cobras a un cliente en particular? Lo digo con todo el respeto, tal vez fuera mejor dar rangos (ej: de 1000 a 3000, de 3000 a 5000, etc.)
No lo sé, dejo este comentario porque fue una de las cosas que me llamó la atención al leer el post.
!Genial el blog!
Kike
Posted at 02:31h, 03 AprilHola Sergio, me parece un trabajo magnífico el que estás haciendo con esta web.
Por favor, no lo dejes. Por lo que veo nos sirve de ayuda a muchos.
Solo comentarte una cosa del diseño que estás haciendo.
Los brazos del jefazo me parecen un poco forzados, como sacando los codos hacia afuera.
Bueno, un saludo y enhorabuena por tu magnifico trabajo.
Sergio Ordonez
Posted at 07:39h, 03 AprilHola Kike, lo de los brazos ya me lo ha comentado mas gente, la cosa es que si los meto hacia dentro se vera demasiado relajado. Creo que al final se vera bien.
Muchas gracias 😉
Saludos.
NeutroN
Posted at 22:08h, 03 AprilDe Nada hermano mucha suerte con el proyecto te esta quedando de lujo 🙂
nickO
Posted at 22:53h, 07 AprilHola hermano, q ha pasado tenemos el post abandonado! queremos ver como va eso! jejeje
Sergio Ordonez
Posted at 08:47h, 08 AprilJeje, ya estoy de vuelta de mis “vacaciones”, en unos segundos actualizo el post.
Whitefeet
Posted at 07:48h, 08 AprilEso, eso, déjate de vacaciones que no sirven para nada XD
Pobre chaval, no le metáis presión, dejad que se relaje un poquito que seguro que se lo merece.
Fantomas
Posted at 17:49h, 09 AprilQué bien se ve el jefe. Voto por el traje azul, se ve mas serio, con mas autoridad. Vaya tus clientes deben estar muy contentos por este trabajo. Enhorabuena Sergio esto va excelente. Saludos!
Whitefeet
Posted at 14:51h, 09 AprilVaya cambio ha dado el boss, jeje.
Eres un hacha!!
Jonathan
Posted at 20:14h, 09 AprilViejo Sergio que bien estan quedando los personajes, por ahi leia un post que decia “esto esta mas emocionante que Lost” y debo aceptar que quiero ver como termina el proyecto,esta buenisima la idea y todo el blog, lo sigo fervientemente en mis feeds, un abrazo y continua con el trabajo, quiero ver los fondos y como termina ya todo, un abrazo y felicitaciones por el blog de nuevo.
Jonathan
Posted at 20:15h, 09 Aprilah! quedo genial la nena inspirada en Angelina Jolie!
levi
Posted at 02:07h, 10 Aprilincreible, definitivamente los colores son tu especialidad, cuanta vida le dan a los dibujos, simplemente eres el mejor!!!felicidades sergio…ohhh y apenas vi un journal en deviantart del 2003 donde decia que decidias cambiar de profesion!!y te lo digo con todo respeto, que bueno que lo hiciste!!gracias por compartir tu trabajo.
saludos!
Sergio Ordonez
Posted at 11:03h, 10 AprilBueno muchas gracias de nuevo, me alegra ver que está gustando la iniciativa.
LEVI: que buena memoria, ni yo mismo recuerdo la fecha en que dejé las oposiciones 😛
SAIL: práctica, prática y visita mi blog, después vuelve a prácticar :p
Saludos.
Sail
Posted at 06:20h, 10 AprilTIOOOOOOOOO QUIERO APRENDER A COLOREAR ASí SOY DE VENEZUELA, DIOS TE BENDIGA ME ENCANTA TU TRABAJO
javier
Posted at 13:25h, 10 AprilImpresionante trabajo el que realizas y gracias por enseñarnos tus trabajos y la realización de los mismos. Espero que muy pronto nos enseñes la continuación.
Isiris
Posted at 16:14h, 10 Apriljoooooooooooooooder
eres mi idolo macho!
esque nose como decirtelo tio jajajajajaj
Sail
Posted at 17:46h, 10 Apriljejeje Buen avance, toy empezando yap a practicar si puedes enviarme un correo para enviarte algo que haga para que me ayuden a corregir los errores
Sergio Ordonez
Posted at 00:21h, 11 AprilSail, si necesitas corregir errores lo más importante es observar mucho y practicar más todavía. Si quieres mi opinión mándame algunas muestras.
Saludos.
levi
Posted at 00:54h, 11 Aprilhola otra vez sergio!!oye no nos puedes hacer esto?!?! ver todo hasta el lunes???va estar de muerte!!!lol…oye puedo hacer lo mismo que sail??(mandarte muestras)…me encantaria que el “master de masters” me corrigiera…ojala tengas tiempo…y pues ha esperar que los monitos han quedado geniales!!
saludos.
Whitefeet
Posted at 04:43h, 11 AprilNoooooooooooooo, no nos hagas eso Sergio, hasta el lunes es mucho tiempo!!!
Están tremendos. El único que no me acaba (y esto es una opinión sin más que espero que no te moleste) es la chica, mi novia y yo lo hemos estado mirando y le vemos demasiado color. Según ella, las reglas de maquillaje dicen que si te pintas los labios de un color oscuro no debe llevar sombra de ojos… yo no sé del tema, pero te lo comento por si te interesa.
Sergio Ordonez
Posted at 11:12h, 11 AprilHay que dar un poco de suspense 😛
LEVI: Estoy bastante ocupado, siempre que no haya prisa no hay problema.
WHITEFEET: ufff, el maquillaje y yo no nos llevamos demasiado bien. Lo tendré en cuenta, posiblemente cambien algunas cosas antes de la versión final.
Saludos.
Atomsk
Posted at 18:07h, 11 AprilSorprende usted es un dios de los colores, me parecen perfectos como los convina. Muy wenos men.
Bravo
Saludos
José Luis
Posted at 14:21h, 11 AprilHola Sergio. Tu página es de visita obligada cada vez que me conecto a internet. Y este último post, muy, muy interesante. Gracias por compartir tus conocimientos y tu tiempo.
Una observación, que no una crítica: las manos de The Bodyguard me llaman un poco la atención por el estilo(4 dedos frente a 5 de The Little Mad Guy) y también por el tamaño y el gesto. Quizá algo mas grandes y rudas irían, desde mi punto de vista, un poco más a juego con el resto del magnífico diseño.
Un saludo.
Fantomas
Posted at 00:36h, 12 AprilHíjole! Ahora acabo de entender la cicatriz del pequeño chico loco. Mi buen Sergio, eres una especie de Rock Star del diseño de mascotas. Siento que éste blog es el tema de un libro de diseño de personajes. Tal vez en un futuro lo consideres ya que cuando estudié la universidad me hubiera gustado encontrarme con un libro de esta naturaleza. Además se vendería bien mi buen amigo. Te volvería a felicitar pero a o mejor ya te cae gordo tanto cebollazo 😛 Je je. Saludos!
Kalsten
Posted at 05:32h, 12 AprilQue ganas de que llegue el lunes 😀
Megar
Posted at 02:14h, 12 AprilMe parece excelente tus propuestas y más aún la forma en que describes el proceso de creación, muchas felicidades. Sin embargo tengo unos comentarios: A mi parecer creo que el fondo absorbe la vestimenta de los personajes, falta jugar un poco más con ligeros brillos, principalmente en los filos de las prendas.
En tu personaje de bodyguard, los tatuajes son irregulares, las líneas están colocadas superficialmente, falta de sombras y brillos; un tatuaje nada simbólico, tal vez un dragón por saber artes marciales, un signo nazi por asesino o bien algo simbólico que caracterice al personaje.
La chica no se que paso, me la imagine rubia desde el principio, tal vez sea un gusto personal, un rostro más bello, más sensual”¦
Bueno espero no ser tan agresivo en mis comentarios, nuevamente te felicito por tu página y seguiré observando tu trabajo.
Muchas felicidades.
Saludos desde México.
Sergio Ordonez
Posted at 18:46h, 12 AprilFANTOMAS: se aceptan ofertas 😀
Megar: no hay problema,las críticas son parte de mi trabajo. Te argumento cada punto:
– El fondo no es el que usaré para la versión final, es un color referencia.
– Cuando diseño personajes por separado contrasto más los brillos, pero piensa que son 5 personajes, hay que ser moderado o se vería sobrecargado.
-Sobre el tatuaje, pues supongo que es cuestión de gustos. Usé un tatuaje tribal, simple y que funciona a tamaños pequeños.
-La chica es italiana, creo que morena cumple mejor con el estereotipo. A mí me parece muy sensual… cuestión de gustos.
Muchas gracias a todos 🙂
Fantomas
Posted at 14:08h, 15 AprilQue padre quedaron los personajes Sergio. Ahora el logo ¿no? Pues mira la mafia me remite a pistolas, trajes, corbatas, espaguetti, sombreros, sangre, asesinatos, elegancia…
Yo visualizo algo elegante pero sangriento. Una tipografía con patines tal vez con alguna mancha de sangre. Alguna pistola integrada en la tipografía… una flor por ahi tirada y sangrante je je. En fin mi buen amigo, espero que te haya servido este mini intento de peloteo. Saludos!
Sergio Ordonez
Posted at 07:47h, 16 AprilHola Juan muchas gracias, que haces por Berlin? Yo tengo a la novia en Mitte, está cerquita, no?
jopicar
Posted at 11:46h, 16 Aprilhola Sergio!
que placer volver a visitar tu blog después de unos días y encontrarme esta entrada casi completada, es un gustazo, en serio 😉
divulgaremos esta preciosidad para que tenga el reconocimiento que se merece 🙂
ya estoy deseando ver el diseño final, está fantástico!
Por cierto, me encantas los gif animados que creaste para drunken monkey, tú crees que sería posible verlos por aquí también?, aunque tardes un poquito?, gracias por compartir tan maravilloso trabajo, un abrazo.
PD: Me uno a la posibilidad de colaborar en un proyecto entre varios, sería una gran idea 😉
jopicar
Posted at 11:52h, 16 AprilPerdona lo de los gif en el anterior mensaje, pero aún no había acabado de leer el post entero, me estaba gustando tanto que ya me puse a escribir antes de terminar, !eso me pasa por impetuoso! 😀
un abrazo, compi 😉
juanjoelx
Posted at 07:00h, 16 Aprilplas plas plas!!!! (aplausos)
Xe eres una maquina!!! te han quedado pero de lujo!!! joder, eres una caña en cuestion de entintados, vaya tela.
Felicidades y muchos saludos desde Pankow-Berlin (ex-DDR)
Juanca Perú
Posted at 13:39h, 17 AprilHola Sergio , sigues siendo mi idolo man! no conosco mucho de diseño ni de logos per creo quedeberia incluirse losojos y cejas es casi un comun denominador en lso personajes de la mafia y la pistola tambien ocn eso y tu genialidad creo qu ela haces suerte maestro!!!
juanjoelx
Posted at 15:30h, 17 AprilYa llevo por tierras germanas unos 2 años y por la novia pues estaremos por berlin unos meses. Mitte.. eso está por el Tiergarten, queda lejos, Pankow está mucho más al norte.
Salut!
Sergio Ordonez
Posted at 20:49h, 17 AprilJopicar, si es que te puede el impetú 😛
JuanJoelx, yo también llevo unos 3 años, pero de ida y vuelta, estamos cerquita, yo vivo cerca de Schöhauser alle (Danziger)
NickO, ahí vamos intentandolo, por ahora me gusto la idea de las rosas, las pistolas y la sangre… a ver si llega la inspiración 🙂
Saludos a todos !
nickO
Posted at 20:33h, 17 AprilHermanito como va ese logo? need some help?
Isiris
Posted at 08:25h, 18 Aprilnu se, yo siempre relaciono la mafia con el poker, no le kedaria mal una buena tipografia, con una luz tenue, como si de una mesa tipica de poker se tratase, de esas alumbradas por una lucecilla donde solo se ve a partir de la boca para abajo 😛 y luego nose, el as de ases con un tiro en la carta 😀 y las letras metalicas, con un tokecito oxidado por los bordes, para darle robustez y antiguedad….
nose es como yo lo veo serguio 😀
un saludo crack
Sergio Ordonez
Posted at 20:49h, 18 AprilIsiris, muchas gracias por las ideas, eso del poker y el humo me parece buena idea.
Mauricio, opinar es gratis, no te cortes. Si que está un poco descompensado, estuve pensando en espaciar los personajes de la derecha un poco más, pero me decidí por lo que ves. Creo que se ve decente, se podría mejorar pero hay que poner un punto y final, como suelo decir, la próxima saldrá mejor…
Saludos.
Mauricio
Posted at 18:51h, 18 AprilExcelente! me gusta mucho el contraste y los tonos que lograste conseguir. Soy estudiante de diseño gráfico y pues todavía estoy en pañales para dar opiniones, apenas voy empezando con esto, pero justo estamos viendo el equilibrio en el diseño y pues no se, siento que esta desequilibrada la imagen final. Siento mas peso del lado derecho, y muy vacío el lado izquierdo; y como el jefe es el personaje principal, tal vez para darle un toque clásico podría ir más al centro para darle mayor importancia… bueno es una sencilla opinión de novato. Dude en ponerla pero me dije: “si no opino me quedare con la inquietud”. Bueno nuevamente te felicito por compartir tus conocimientos con todos nosotros. Saludos!!
Sergio Ordonez
Posted at 17:05h, 22 AprilHola Levi, por supuesto que lo terminaré (no me queda otra :P), mande un boceto al cliente pero no hubo suerte.
En cuanto tenga noticias lo actualizo.
Saludos a todos.
levi
Posted at 16:14h, 22 Aprilsergio!!que paso??ya no vas a actualizar este rollo…pregunto porque talvez algo paso…me gusto mucho la idea y me encantaria verla completa…
Sail
Posted at 16:58h, 22 AprilxD Waoo amigo quedo fenomenal, sin Criticas jejeje, para mi es dificil criticar algo que no se hacer y no voy a comprar jejej xD!
alexgead
Posted at 21:34h, 22 Aprilsergio muy buenos tutoriales
gracias por compartir tu experiencia
estamos al pendiente del logo de mafia death
suerte
Adriana Galvez
Posted at 16:00h, 28 AprilHola me encanta este post, bueno todos pero este es mas emocionante, deseo algun dia poder realizar buenos diseños dignos de que me contraten jeje, yo queria hacer un commentario sobre la chica, me gustaba mas como se veia de morado, se veia mas sexy y femenina.
Sergio
Posted at 12:00h, 02 MayNo habia reparado que tu blog está en español… más que mejor!!!!
Eres un Maestro… y agradecemos (creo que todos) el que compartas tu conocimientos… eso habla bien de ti.
Saludos de Colombia
nickO
Posted at 13:53h, 02 MayAbandonamos el post? queria ver el resultado final…
Sergio Ordonez
Posted at 06:34h, 03 MayHola NickO, por supuesto que no. Estoy trabajando en ello, cuando lo termine actualizaré el post.
Saludos.
Klimt
Posted at 13:41h, 07 MayNo se porque, pero como que la mujer se parece a Monica Belluci, jeje y no a Angelina Jolie
alexgead
Posted at 21:02h, 07 Mayque tal sergio dijiste qu aceptabas algunas
sugerencias para el logo a ver que te parece esta sugerencia el logo seria un billete un dolar al centro una calavera con una o unas
pistolas como el logo original en circulo alrededor de la calavera la tipografia mafia death el nombre representa dinero y muerte
en las 4 esquinas del billete cartas una ruleta relativo a las apuestas tal vez sea
o este muy saturado es solo una idea
Sergio Ordonez
Posted at 13:47h, 13 MayHola Gaston, muchas gracias 🙂
Normalmente diseño en alta resolución, alrededor de 5000x5000px por personaje, así tienen bastante margen para imprimir si lo necesitan.
Saludos.
Gaston
Posted at 11:49h, 13 MayMis felicitaciones por tus trabajos, realmente son de una calidad que dan ganas de ponerse a pintar ya y lograr ese resultado.
Me gustaria saber en que formato los entregas ya que si no son vectoriales si se necesita redimensionar como se hace?
Nuevamente felicitaciones!!
Raynier Borja
Posted at 22:10h, 17 MaySergio te felicito eso estuvo como todos tus trabajos, genial!!!!!!!!!!!!
Whitefeet
Posted at 16:04h, 19 MayHola Sergio, por curiosidad, ¿cómo has quedado con el logotipo?? ¿conseguiste sacarlo adelante??
Sergio Ordonez
Posted at 23:43h, 20 MayBuenas Whitefeet, sí, el logo está terminado, en cuanto tenga un rato actualizo el post.
Si tienes curiosidad puedes verlo en: http://sergitosuanez.deviantart.com/art/Mafia-death-85637910
Saludos 🙂
Whitefeet
Posted at 09:36h, 27 MayAh, muy bien!! me gusta como te ha quedado, enhorabuena!!
jopicar
Posted at 16:42h, 27 MayFantástico el logo, la verdad, no esperaba menos de tí 😀
Y le queda que ni pintado, lo dicho, un crack!! 🙂
Enhorabuena!! 😉
Germán Capisano
Posted at 09:22h, 01 JuneMe encanta como trabajas, Sergio.
Yo espero poder trabajar pronto de esto, ojalá se dé… aunque para usar el Photoshop todavia soy re-newbie, yo me llevo un poquito mejor con Corel.
Saludos desde Argentina!
Marco Cortes
Posted at 20:56h, 21 Junewey man muy apero sigue asi que eres de los mejores.me gusto mucho tu entrevista en psd tuts creo que haz alcanzado tu lugar sigue trabajando duro
Sergio Ordonez
Posted at 14:28h, 20 AugustPues menos cervecitas y más ahorrar 😛
En serio, te aseguro que merece la pena 🙂
Saludos.
Sergio Ordonez
Posted at 15:57h, 20 AugustHola Alejandro, no tengo mucha idea de como funciona el sitio, yo solo escribí el tutorial.
Lo mejor es que postees tus dudas en la página de PSDTuts, si tienes problemas con el inglés dímelo y yo te traduzco.
Saludos.
jopicar
Posted at 16:55h, 20 AugustLa verdad, me parece que te vas a convertir en un asiduo de psdtuts, eres un crack!!, y te van a querer monopolizar 🙂
Tu trabajo se merece esto y mucho más, lo que me da pena es que webs como psdtuts puedan privarnos de disfrutar aprendiendo contigo, aunque en cierto modo también es lógico, pero insisto, es una pena 🙁
Enhorabuena Sergio, fantástico trabajo (as always)
Un abrazo 😉
Im The Supervisor
Posted at 12:53h, 20 AugustLamentablemente no tengo ni un centavo 😛 pero lo que he encontrado en tu blog es lo mejor hasta hoy en la web 🙂 muchisimas gracias =D
alejandro
Posted at 14:45h, 20 AugustHola Sergio, je, me interesa tu tutorial pero soy de Argentina. Y lo podría pagar en dolares, ¿hay alguna dificultad para que llevemos a cabo esta transacción?. Se paga por mes o se puede pagar todo junto? Un abrazo, muy buenos tus trabajos! Te felicito!
Sergio Ordonez
Posted at 20:34h, 20 AugustHola Jopicar, muchas gracias.
Pero de hecho es lo contrario, piensa que invertí en ese tutorial casi una semana de trabajo, eso es mucho tiempo y obviamente me pagaron por ello, si no, no lo hubiera hecho.
Por un lado ellos hacen dinero (no son una ONG), por otro apoyan a los artistas como yo (que no es lo normal) y por otro comparten con los lectores mucho contenido gratuito (que ellos tienen que pagar).
Sinceramente, PSDTuts es un ejemplo de como hacer las cosas para que todos salgamos ganando. 9 US$ muy bien invertidos 🙂
Saludos.
PS: en cuanto tenga un rato contesto a tu email.
Im The Supervisor
Posted at 22:12h, 20 AugustLa verdad no se me hace mucho dinero 😛 pero no tengo tarjeta de credito para depositar a una cuenta de paypal y sobre las cervezas 🙂 soy una persona sana n_n no le doy a esas cosas 😛 hare todo lo posible quiza surveys o algo por el estilo. Gracias por todo =D
Martín
Posted at 13:25h, 21 AugustMe has hecho hacerme una cuenta Paypal y registrarme en esa web sólo por tu tutorial (que ya que estamos me miraré todo) que sé que cumplirá mis expectativas. 😀 Agradecerte que gracias a ti aprendo cada día un poco más.
GRACIAS!
Sergio Ordonez
Posted at 07:31h, 22 AugustYa verás que sí Martín, cuando eches un ojo vuelve para dar tu opinión please 🙂
Saludos.
Martín
Posted at 09:31h, 22 AugustNo te preocupes que en cuanto le eche el ojo vendré a decirlo. Aún estoy pendiente de activar la cuenta en Paypal, tu sabrás mejor que yo como va esto. Así que en cuanto me hagan los ingresos para activarla y me inscriba en la web, me tendrás aquí opinando 😉
morcio
Posted at 14:17h, 25 Augustwoow… si que si.. vale la pena pagarlo… cuando gane por mi trabajo te pago! =)
LostDZ
Posted at 13:18h, 25 AugustBueno, con un esfuerrrrzo me hice plus solo para leer ese…
llamémosle tutorial, por no llamarlo enciclopedia.
Martín
Posted at 14:52h, 25 AugustPues por fin he tenido acceso al mejor tutorial sin ninguna duda.
Y decir que si con éste no aprendes, debes hacértelo mirar :D. Muy bueno lo mires por dónde lo mires y vale la pena tenerlo. Sin lugar a dudas creo que daré un salto en mis trabajos gracias a él.
Sólo me queda felicitarte por ello, animarte a que sigas así y sigas trabajando igual de duro.
Enhorabuena!!
Sergio Ordonez
Posted at 22:40h, 25 AugustMuchas gracias amiguetes, me alegro que os haya merecido la pena 🙂
El próximo será gratis.
Saludos 😉
Andres
Posted at 20:42h, 28 AugustDefinitivamente tu trabajo es de lo mejor Sergio, cada vez es mejor, espero poder alcanzar la calidad de dibujos que tienes, aunque todavía me falta mucho. 🙂
anita
Posted at 22:40h, 28 August¿El tutorial esta en inglés? Porque si es así no lo voy a entender.
Sergio Ordonez
Posted at 08:15h, 29 AugustHola Andrés, nada que un poco de práctica no solucione 🙂
Anita, cuando descargas los archivos, dentro del zip incluyeron una versión en html, del tutorial en español.
Saludos.
n0cks
Posted at 13:28h, 30 AugustBuenas Segio.
Soy nuevo por aquí, pero he estado leyéndote varios días, y ante todo, agradecerte la cantidad de información que haces pública, ya que esta ayuda muchísimo a la gente que ya lleva tiempo en el mundillo, y sobre todo, a la gente, que como yo, está empezando.
Decirte que me encanta el mundillo, aunque realmente llevo muy poco tiempo en él, por desgracia.
De igual manera, me gustaría pedirte ayuda sobre el tema de las tabletas gráficas.
El caso es que he visto dos Bamboo, una en negro, por 79,90€ y otra en blanco, por 99,90€ (Bamboo Fun, pone en la página oficial que es esta última.)
Creo el modelo de la primera es MTE450, y el de la segunda es el CTE450, pero no se si es correcto.
Ambas son A6, y parece ser que tienen las mismas especificaciones.
¿Cuál crees que debería coger?
Perdona por el tocho escrito, y nada, sin más me despido, pero no sin antes desearte mucha suerte en el futuro, al igual que con SoSNewbie.
Nos vemos.
Sergio Ordonez
Posted at 18:48h, 30 AugustHola Nocks, muchas gracias 🙂
Me imagino que lo que varía será el diseño o los extras.
Yo cogería una graphire, aunque es un poco más cara. Si ya puedes permitirte una Intuos entonces genial.
Saludos.
n0cks
Posted at 20:13h, 30 AugustBuenas Sergio. Gracias por contestar.
Pues a ver… te comento. Ahora mismo tendría dinero para las dos que te he descrito antes.
El caso de la Intuos3, es que bueno…tendría que ahorrar otro mes mínimo para poder hacerme con ella. Realmente no me importaría, si realmente vale la pena.
Cuál es la principal diferencia entre la Bamboo y la Intuos3? Yo es que por ejemplo, veo diferencia en los niveles de presión y en que esta última detecta cuando inclinas el lápiz digital. Algo más? Por que creo que al fin y al cabo todo lo demás es parecido, no?
Respecto a la Graphire…no he podido mirarla, ya que en wacomonline aparecen descatalogadas :s
Así que como te digo, no me importaría ahorrar para la Intuos3 A6, lo único que tengo miedo de que al final no me termine gustando esto, aunque no creo que pase, y quizás el comprarla también sea un impulso hacia el seguir.
Saludos. Espero tu consejo.
Sergio Ordonez
Posted at 06:08h, 31 AugustHola Nocks, los niveles de presion es lo más importante, al tener más sensibilidad puedes conseguir resultados más finos.
De todas maneras prueba con la Bamboo, dentro de un par de años, si sigue gustándote puedes invertir un poco más para hacerte con la Intuos.
Saludos.
n0cks
Posted at 15:23h, 31 AugustBuenas Sergio, gracias por contestar ^_^
La verdad es que sí, que los niveles de presión son primordiales.
Por cierto… acabo de pasarme por el pueblo de mi madre, y suerte la mía, me ha caído dinero del cielo entre parientes y tal… y ahora tengo 160€ más o menos.
Quizás si que me compre la Intuos3 A6, ya que, como te dije en el post anterior, seguramente me motivará más.
Yo realmente creo que voy a seguir con esto, ya que es algo que siempre me ha gustado, así que apostaré por la Intuos3 ^_^
Saludos, y gracias 🙂
Sail Guerrero
Posted at 06:50h, 01 SeptemberAhora si que me quede con las ganas voy a llorar, aqui en venezuela no puedo pagar con dolares…nos tienen controlados con eso. =(
Sergio Ordonez
Posted at 12:50h, 01 SeptemberHola Sail, no tengo mucha idea, pero podrías contactarles y preguntar si hay algun método de pago alternativo.
Saludos.
Dario (Atomsk)
Posted at 15:13h, 01 SeptemberLlebo rato sin visitar tu blog, y me entero de eso :), queria pagar los 9dl pero lo malo es que no tengo targeta de credito en mi cuenta paypal 🙁 y pues ni modo, ya sera alguna otra vida.
Sigues siendo mi idolo en tu trabajo.^^
n0cks
Posted at 14:06h, 01 SeptemberDe todas maneras, al pagar mediante Paypal, el dinero se reconvierte, ya que yo tube que pagar a una página en dólares, mientras que yo tengo euros, así que si admiten esa forma de pago, debería valer.
Saludos.
Julián Pérez
Posted at 12:42h, 25 SeptemberHola Sergio, felicitaciones por tu trabajo, tenés un estilo muy bueno, yo también estoy tratando de salir adelante como freelance, específicamente como ilustrador; ojalá algún día podamos trabajar juntos 😉
Saludos desde Colombia
Rommel
Posted at 22:11h, 26 Septemberbueno yo pago ahi la mensualidad, y el tut es muy bueno, ademas q si viene en español, realmente lo agradesco.
EDITADO: La redistribución sin consentimiento expreso del propietario (PSDTuts) es delito, al pagar la cuota de 9US$ contribuyes a que siga haciendo estos tutoriales que tanto aprecias. Si lo pirateas, ellos no obtienen beneficios, a mi no me pagan, y tú te quedas sin nuevos tutoriales.
Un poquito de por favor 🙂
Sergio Ordonez
Posted at 08:07h, 01 OctoberMuchas gracias a ti por visitarlo 😉
amzg
Posted at 04:55h, 01 OctoberHola Sergio!!
LLevo mucho tiempo leyendote en la sombra jeje y solo puedo decir una cosa jeje eres la ostia!!!
Me encanta tu estilo y tu blog se sale, nunca te he dado las gracias por todos los tips y tiempo que decicas para nosotros, son muy utiles. MUCHAS GRACIAS!!
Ya me he bajado el tutorial, es MUUUY bueno! Han merecido la pena esos 9$, a ver si mejoro mi tecnica de colorear, es lo que peor llevo…me vuelvo loco con los volumenes jeje, hay que practicar!! jeje
Un saludo y gracias!
Gabriela
Posted at 16:38h, 05 OctoberHola Sergio, felicitaciones por el trabajo, realmente le pones corazon, y se nota!
Yo estoy empezando a colorear mis vectorizados y justo buscando una alternativa para hacerlo con Ps y pasarlo a Illus, encontre tu web.
Me toca el título, a pesar que no soy newbie en el Ps, si lo soy en el coloreado y el dibujo. ^^
Con tu review estoy pensando seriamente comprarme una wacom Bamboo(una chica para comenzar) porque soy de Argentina y aca los precios son terribles.
Muchas gracias por acordarte de que hay gente como una, que siempre fondea en internet buscando buenas webs, como la tuya.
Abrazos desde Argentina.
Sergio Ordonez
Posted at 07:42h, 06 OctoberHola Gabriela, muchas gracias 🙂
Si quieres colorear en Photoshop te aconsejo que hagas el esfuerzo, verás que merece la pena. Si quieres hacerlo con illustrator realmente no te hace falta.
Saludos 😉
bruno aejandro
Posted at 16:17h, 06 OctoberHaber quiero saber si entendí.
Quieres decir que por 9 dolares al mes puedo descargar tu tutorial más otros tutoriales del área plus?
Si es así me lo puedes confirmar? Así mismo quisiera saber si el tutorial esta como videotutorial.
saludos y gracias
JUAN CARLOS
Posted at 21:43h, 08 OctoberHola Sergio increible tu trabajo en verdad
Tengo algunas dudas si pago los 9 dolares a PSD tuts, me puedo dercargar todo el contenido de el tutulorial o esta segmentado o algo asi?, lo puedo bajar todo completo el mismo dia q pague?, que es lo que contiene?.
Unas cosillas mas estoy por comprar una intuos3 me recomiendas el tamaño A5 6×8 u otra mas grande?, o es mas recomendable la cyntiq claro seria la 12w es muy pequeña?, cual me recomiendas
SALUDOS DESDE MEXICO
Sergio Ordonez
Posted at 15:28h, 12 OctoberHola Juan Carlos y Alejandro, perdón por contestar tan tarde, desgraciadamente tuve una apendicitis que me ha tenido más muerto que vivo durante la última semana.
Lo mejor es que mireis en la misma PSDtuts.com, yo no tengo nada que ver con la gestión del sitio, sólo este tutorial.
En este caso no hay video, solo material escrito y archivos en alta resolución de Photoshop.
Sobre la tabla, te recomiendo la intuos 3 A6, si el dinero te llega entonces la Cintiq 12 pulgadas.
Saludos.
Im The Supervisor
Posted at 01:46h, 17 OctoberYo ya pague los 9 dlls que es muy poco la verdad solo que tengo 18 años y no tengo tarjeta de credito tube que conseguir trabajando en internet y depositando a paypal 😀 .
El tutorial esta de wow :O y si, si puedes descargar mas tutoriales de la pagina mientras pagues tus 9 dlls al mes 😀
Sergio, felicidades y gracias 😀
( Soy el del primer post 😛 )
Espero que mejores Sergio no sabia lo de tu apendicitis, entro diario a sosnewbie y siempre crei que nos tenias descuidados 😛 pero ya vi la razon.
Nuevamente GRACIAS 😀
amzg
Posted at 08:57h, 29 OctoberAl loro con la suscripción, yo sólo la hice para un mes y asi bajarme este impresionante tutorial y no se porque me acaba de pasar paypal la del segundo mes, es como si estuviera suscrito para el resto de meses…no lo digo como critica ni nada parecido, es sólo para que esteís atentos si solo querías una susbripción de un sólo mes como yo. Desde la misma cuenta de PSTUTS se puede cancelar la suscripción.
Un saludo.
Sergio Ordonez
Posted at 16:23h, 01 NovemberPues ahí queda, me imagino que al hacer la subscripción aceptarás unos términos del servicio, ojo! eso siempre hay que leerlo, aunque sea de pasada.
Gracias por el aviso Amzg.
jesus
Posted at 17:19h, 20 NovemberQue buenos los bocetos tio!! Eres un artista !! Yo los dejaria como estan, si acaso cambiarles la boca, …son mafiosos pero les veo como con mucha mala leche.
Envidio tu arte capullo!
Sergio Ordonez
Posted at 21:46h, 20 NovemberJesús, la boca te la cambiaba yo a ti 😛
Un respeto al artista! jeje.
Saludos.
Ekaterina
Posted at 10:21h, 25 NovemberHello, Sergio!
Thank you so much for your charity and openess, I tried your lessons and I’ve got quite nice results with inking. But now I faced with a small problem, could you clearify that for me:
– for example I work with picture in high resolution and size, but final image should be small. Question: in what stage should I resize image? Right after inking or after flat coloring?
Thank you and be well,
Ekaterina, Vladivostok (Russia)
Sergio Ordonez
Posted at 16:34h, 25 NovemberHello Ekaterina, thanks a lot 😀
The best is resizing at the end, after you finish everything. Bigger you start better will looks at the end but obviously we have hardware limitations so just keep in mind how powerful is your hardware and your final size of delivery.
I usually start at 7000x7000px with the inking, later I resize it down to 5000x5000px and I color it.
I hope this help 🙂
Cheers.
Sergio
Ekaterina
Posted at 07:33h, 29 Novemberthank you, Sergio! I was afraid all the picture will be ugly shrinked with artefacts, but not at all, it looks fine and clear in small size too.
Again was impressed how simple and effective your teqnique is (I mean separate layers for different light effects).
Juanele
Posted at 08:52h, 20 JanuaryTeniendo la página llena de publi me parece exagerado pagar por el tutorial. Teniendo muchos recursos gratuitos en la red, espero que tengas suerte y alguien te lo compre.
Sergio Ordonez
Posted at 17:03h, 20 JanuaryHola Juanele, vamos por puntos:
1.- YO no vendo nada, PSDTuts me contrató (pagando un buen dinero) para que hiciera ese tutorial.
2.- Además del tutorial tienes acceso al diseño, valorado en 600US$ (dinero que también pagó PSDTuts.com).
3.- No toda la web es de pago, sólo una parte.
Esto es un negocio, PSDTuts invierte muchísimo dinero para conseguir material de primerísima calidad, y esto es posible gracias a la publicidad y a las subscripciones.
Saludos.
Ina
Posted at 16:01h, 03 MarchYo si toy embarcá!! Ni paypal ni tarjeta de crédito! Y saben cuanto gano al mes, con mi trabajo? Alrededor de 20 usd para vivir!
De todas maneras es bueno saber que existen webs así!
Yoshiro
Posted at 15:50h, 20 MarchHola soy de Guatemala, me llamo Roberto, pero me dicen Yoshiro.
Soy Creativo en una agencia de publicidad y realmente me he quedado con la boca abierta por la calidad de tu trabajo. Es realmente impecable. Ya he visto lo que tienes en Devianart y es genial.
Felicitaciones y animo/
edgar ivan
Posted at 06:04h, 08 Mayhola tu tutorial esta excelente…bueno ..siempre paso por PSDTUTS me parece una pagina genial…y no me importa pagar los 9 dolares..para ver tu tutorial completo…el problema es el sgte…no se como comprar la cuenta si me podrias ayudar….seria magnfico…grax de antemano…espero tu respuesta..:)
Sergio Ordonez
Posted at 18:14h, 08 MayHola Ivan, por qué no pones un mensaje de ayuda o contactas con el webmaster, yo no tengo mucha idea de cómo funciona.
alebacic
Posted at 18:16h, 30 MayCon un amigo meneamos el post! Espero que más gente conozca tu arte y la comunidad freelance cada vez sea más grande y profesional. Mucha suerte!!! Un abrazo.
Sergio Ordonez
Posted at 11:03h, 31 MayMuchas gracias amigo 🙂
Adrián
Posted at 04:46h, 16 JuneHola Sergio, desde hace varios meses, veo tu blog con mucha frecuencia para fijarme en detalles y poder mejorar. Me encantan todos los trabajos que haces, sobretodo este. Lo que te quería decir es que el personaje “The Bodyguard” (O como se escriba xD) Me parece que le falta 1 dedito índice en la mano de la derecha, ¿o es que lo tiene escondido? Yo cuando me pongo en esa posición de crujir los dedos se me ven desde ese ángulo todos menos el gordo. Me lo puedes explicar? 🙂
!Ah! ¿Y qué ha sido del logo? No lo he visto por ninguna parte ni nada..
Espero no ser un incordio ni mucho menos..
Adrián.
Adriana
Posted at 11:26h, 27 JulyHola sergio, vi que usaron tus diseños para wallpapers de nokia 5800, te dejo los links por si no estabas enterado.
Sergio Ordonez
Posted at 11:48h, 27 JulyHola Adriana,
no tenía ni idea, ya les contacté para que borren las imágenes.
Gracias por el aviso 🙂
L3OX
Posted at 15:24h, 20 MarchHERMANO SOY LEOANRDO MONASTERIOS DE VENEZUELA TE FELICITO Y TE DOY LAS GRACIAS POR ENSEÑARNOS UN POCO Y MUCHO DE TUS TECNICAS AQUI TE VOY A DEJAR ALGO DE MIS ILUSTRACIONES. SE TRATAN DE UNOS CARROS TUNING PERO LOS DE LAS MASCOTAS NO LAS HE MONTADO EN LA WEB PERO SI ME ESTOY INCORPORANDO A LO DEL PHOTOSHOPE LO QUE HE HECHO ES CON MOUSE Y DE VERAS QUE YA ESTOY POR COMPRAME UNA WACOM PARA MEJOR LOS DIBUJOS SALUDOS DESDE AQUI DE VENEZUELA Y DE NUEVO GRACIAS
Cris
Posted at 22:37h, 18 NovemberHola Sergio!
Acabo de ver tu ilustración en el programa “El Hormiguero” de Pablo Motos en el decorado usado en el musical de El Padrino.
Un saludo.
Sergio Ordonez
Posted at 23:52h, 18 NovemberHola Chris, acabo de recibir otro email diciéndome lo mismo. ¿Por casualidad sabes dónde puedo ver algún video de esa parte del programa? Muy fuerte que ya ni las cadenas de televisión respeten los derechos de autor.
Saludos!
xemix
Posted at 00:15h, 29 DecemberTe paso el enlace de Youtube…
http://www.youtube.com/watch?v=dtxpvAddStM
Felicidades por las ilustraciones!!!
Sergio Ordonez
Posted at 21:06h, 30 DecemberMuchas gracias, ya me puse en contacto con ellos y está todo arreglado.
yeison
Posted at 19:28h, 18 Decemberbrother, eres un maestro del color fabulosos esos personajes soy diseñador grafico mejor didicado a la impresion, me encantaria pulirme de ese modo.
eres una inspiracion de trabajo.