

How to create a Vector Mascot in Illustrator
Hi guys! I recorded the whole process in the making of Cheeky Monkey vector mascot in Illustrator. There will be several videos and I will update this post frequently. Subscribing to my SOSFactory Youtube Channel or Facebook page is a good idea to stay up to date.
Learn how I create vector mascot designs in Adobe Illustrator. Work in progress images and videos included.

Sadly the video is about 15 hours long, so I need to split it in different parts and accelerate the time to compress it within YouTube´s restrictions. I will write some annotations along the videos where I share some tips to improve your inking in Photoshop and your coloring in Illustrator but I’m sure lot of questions will pop up on your mind, feel free to ask.
Feel free to visit this post to learn more about my mascot design process or visit this character design tutorial.
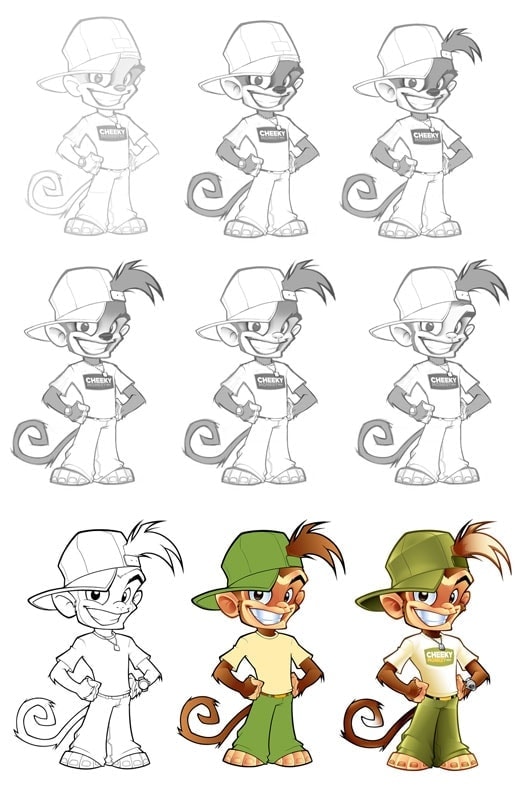
Here you can see the mascot design evolution from the concept
to the final mascot design in Illustrator.
And some close-ups:

Video 1: some tips to improve the quality of your lineart in Photoshop
I receive lot of questions about my digital inking process: how do I get so sharp and crisp lines?. What brush settings do I use?. How big is my canvas?… In this video I reply all these questions and some others, if your lineart looks pixelated or blurry take care of these advices and you will notice a change.
EDIT: Youtube delete all my annotations… sorry, if you really want to learn how to ink digitally I suggest you follow my inking tutorial.
Video 2: how to vectorize your lineart in Illustrator
Vectorizing your lineart in Illustrator with Live Trace is so easy that you don’t really need to deal with vectors until the final conversion. I find much more comfortable and natural working with Photoshop and a Wacom tablet, also the inking process is much faster.
At the end of this step I have lot of white shapes over a black silhouette.
Video 3: Assigning flat colors in Illustrator
This video could be a bit boring for expert users, I just assign flat colors and organize the shapes into groups, it’s very important when working on complex illustrations.
Video 4: Applying gradient colors in Illustrator (Part I)
I forgot to record the first minutes of this video, I just applied very basic gradients and cut big areas into smaller ones, then I start the tricky part: adding shadows and lights.
Video 5: Applying gradient colors in Illustrator (Part II)
So here is the last video, after 15 hours of work our vectorial mascot design is completely done. Crisp and clean!
I hope you enjoyed the process, I’m already working in the next Masterclass, this time about vector illustration in Illustrator, in the meantime if you have any question or suggestion just let me know.

See you soon!

Mascot designer for 23 years, with 500+ characters drawn for brands, schools and teams. My tutorials have been published in Smashing Magazine and Envato Tuts+.
47 Comments
Robert
You are a genious!! Your videos are of GREAT use to me, I am very grateful to you! i love your avatar too…
Mindy
Thanks so much for the reply!! I actually don’t own photoshop… but do you think the masterclass will still be useful?
I need to design a mascot for a website, and I’m struggling with the canvas size to make it look good on the site, even when it’s zoomed in.
sergio ordonez
You are welcome Mindy 🙂
The masterclasses are quite easy to follow, in order to create clean a crips lines you only need a good sketch and 2-3 tools (brush, eraser and optionally the history brush). Any free Photoshop version in the last 15 years will work for this purpose.
Key is using a very high resolution canvas, I use around 10.000 x 10.000 px, when finished you can resize it down to the size you need and it will look cristal clear.
Good luck!
Sergio
Mindy
I couldn’t see the tips even with annotations on. Are they deleted or maybe I’m not doing it right?
Anyway, is there any way you could briefly write the tips out for the video “12 tips to improve lineart in photoshop”?
Thank you..!
sergio ordonez
It seems Youtube deleted them in one of their udpates 🙁 At the shop I have a premium masterclass about digital inking.
Solaiman Sumon
Great illustrator designing tutorial you have made and published with us . So much thanks for this well posting . Keep continue sharing , thanks .
Suzan
Every details have been mentioned here with very careful mind. The steps are cleared with the images so well.
nothingness
PLz share video tutorials…
Jerm
Sergio,
You continue to be a source of inspiration and information for us all! I’ve been drawing and graphic-designing most my life. I watched your tutorials on the cheeky monkey illustration and was super pumped on your inking technique in Photoshop. I’ve never made the switch to a tablet only because I’ve never used one that made me feel faster. Can you give me any suggestions on the size/brand that you prefer?
Your Characters are RAD! While your insane skill makes me feel a bit novice, it is also inspiring and helps me remember that practice is the only way to get any better. Keep it up!
~Jerm
Karen Mitchell
I would like to see it on slow motion so I cen see what your using for some steps!
Karen Mitchell
Thank you thank you thank you for sharing. Just what I needed to know!
kaenes
wow..really amazing tut!
Maa Graphic1307
u r best
Gritnz
How long did it take you to do colorize this from start to finish?
Sergio Ordonez
Around 15 hours.
YonkersDave
Is there a way to watch any of these tutorials in regular speed, without the music?
You are amazing, by the way.
Gritnz
I download the tutorials from youtube and used VLC video player. You can slow down the play back a little I found it easier to follow
Sergio Ordonez
Sorry, it’s not possible right now.
Sergio Ordonez
It’s like 15 hours of video… sorry it’s not possible.
Tina
I see you’re controlling those gradients as if they were shapes with bezier handles. Is that what that is or is there some trick to gradients in Illustrator because they’re just so unfamiliar to me compared to Photoshop gradients. Also, how did you change some of the black lineart to colored gradients like on the monkey’s ear? Looks to be a very good technique to make him look more natural and pop out.
Sergio Ordonez
Hi Tina, it’s not just you… I hate Illustrator, it’s ages behind Photoshop in terms of usability. I colored the lineart just by using a new shape in top of the black lineart, the secret tip is I duplicate the black shape, change the color and then cut it so it fits exactly in the original place.
jazz
hi! I both have adobe photoshop cs2 and adobe illustrator cs5.. i dont use them to edit photos, i use them to create art from a blank canvas im currently using paint tool sai bcoz it’s easy and simple but it lacks some tools that i need to enhance my work. im pretty good at sketching and drawing using pens and paper but im really not familiar with adobe programs my 1st question is how can i draw in vector mode in photoshop? bcoz dont like to work in raster mode. 2nd is how can i remove the lines that appear when i use the blob brush tool in illustrator? hope you can help me.. bcoz i havent seen any online tutorials about it so far. thanks
Benchscream
wow! idol!
Phil Oliveira
Hey Sergio, Love this stuff!!! I have one question though. I’m using CS3 and I bring in my line art which I did in photoshop off a pencil/ink sketch. I live trace it and expand it and this is where my problem lies… The line art becomes the “shape” meaning I can’t fill in the “planes” with flat color, the only color I can change is the line art it’s self… I can Live Paint it but that leaves a white “Halo” around everything. I’ve been racking my brain and the web for help so I figured I’d just ask you.
Keep up the good work!!!
Cheers
Phil
Sergio Ordonez
Click on the shape > right click > release compound path.
It certainly will change all shapes to black, change all of them – but the profile, the bigger one – to white. You will spend some time but it’s worth.
Cheers!
Ronald L. Harris
These tutorial videos art really really good. I’m new at mascot design so this helps so much. Please keep the tutorials coming.
Lian Tluanga
Ima Numberone FAN 😀
Israel
Hi sergio
My question is:
How you get so soft gradient?, I know that you make a lot of vectors but I don’t know get then soft.
Sergio Ordonez
Hi Israel, just practice 🙂
Israel
ok thanks, sorry my english
Rey Enok Madrid
Great stuff Sergio… like always
Gustavo Simas
Daaammnn! DAMNNNNNNNNNNNN! You guyss Help mee a Lot! THANXXXX so Fucking Much! I did knoww about thiss… just Awesomeee!
Thanx guys! Really helps me!
S.O.S Rockss! o/
Akrep_484
hı Will you give me the psd files?
Sergio Ordonez
No.
Toki【ツ】
Hey Sergio,
Can’t wait for video 3 to come out!
🙂
Fer Osorio
Hey there Sergio
I could say I’m one of your followers and students. Some months ago I practiced your tut for inking in photoshop and coloring in illustrator (you can see here my deviation http://di5ainer.deviantart.com/#/d34wpdh. I found your blog pretty much inspiring and motivating, as by the time I continue to practice my drawing and illustration. A thousand thanks for every piece of time you dedicate to us newbies.
Sergio Ordonez
Hi Arvin, it´s a good idea I will think about it!
ikaznarsis
wow, its cool!! i like this character, Mongkey cute!!
Sergio Ordonez
Hi Toki, you are right.
I don´t like Illustrator though it was some advantages, it´s too picky and very time consuming but the design is cleaner and there is no scalability problems. So I use Illustrator when:
1.- The client demands it for any reason.
2.- The client really need it, in case he plains to print really big.
I usually charge a fee for vector illustration since it´s more time consuming. If you don´t plain to print really big stuff, the extra expense is not worth in my opinion.
Cheers!
Arvin
Flash’s brush system is very fast and a good compromise between having smooth lines but still feeling organic, in the way that Illustrator isn’t. Plus being able to fill and change colors easily since it’s vector is an advantage over Photoshop. If only its layer system (with annoying blending and transparency modes) were more like Photoshop’s.
At some point in the future I’d love to see a video shot in live action of you doing your stuff… it’d be informative to see your hands, how big your gestures are, how fast your hands move. The screen capture paints only part of the picture!
Arvin
Great video! Inking is the thing that frustrates me most in Photoshop… it’s something I can do more intuitively by paper and pen, but who wants to do that? 🙂 I wish Photoshop had a brush system like Flash, which is faster than Illustrator and smooths strokes pretty intuitively.
Question: It looks like you’re in a Cintiq 21ux. I am on the 12wx, and I was wondering if you had experience with the 12wx, and whether upgrading to the 21ux is worth the extra 1000USD, other than the size (which can be both good and bad) and higher resolution. Is it more sensitive, more conducive to producing smooth strokes, etc?
Thanks a lot.
Sergio Ordonez
Hi Arvin,
Illustrator actually have a brush system, but I tried it a couple of times and desisted because it was a pain.
Flash is really that good?
No, I have no experience on the smallest Cintiq, I think the expense is worth if you have lot of work. Your productivity will increase a lot, if it´s just for a hobby I bet I would stick to the 12″ version.
Toki Tover
Hello Sergio,
Great tutorial, thank you…
Question, what makes you decide whether or not to color in illustrator versus photoshop?
I remember you stating that you do not really care for illustrator.
Thanks!
Toki Tover
Sergio Ordonez
Yes, with standard tablets you don´t have so much control, it´s quite more time consuming but I know artists who can do it. I personally would use vector tools if you don´t have a Cintiq yet.
Tim
Thank you Sergio!
I bet that really speeds up the process. Just started using a Wacom tablet again and I am hooked. The next thing I want to get its a Cintiq!
Tim
Great video. It is very helpful in the inking process. Did you do a ruff sketch in pencil first or did you do a ruff sketch in Photoshop? Can’t wait to see the coloring video. Thanks for these.
Sergio Ordonez
Hi Tim, thanks a lot 🙂
In the past I used to draw and scan the sketches but since I have a Wacom Cintiq 21UX everything is done digitally.